Friday, July 30, 2010

Stamping on Tiles

Here's a great idea for a gift...Christmas is only 5 months away you know (ugh!).  I've tried to stamp on tiles many many times and have not had any success, but this time I finally got it!


Supplies
Tiles:  Ivory Travertine 4" x 4" bought at Lowes
Stamps:  Elements of Style
Ink: Black StazOn
Stampin' Pastels:  Rose Red, Garden Green
Accessories:  Blender Pens, Folk Art Clearcote Acrylic Sealler, Cork Sheet, Multipurpose Liquid Glue

Tips
Stamp the tile with StazOn Ink and then with your Blender Pen and Stampin' Pastels color your stamped image. 
You cannot use classic ink on these tiles, but you can use Craft Ink...I have not tried either so I only know what I read, I'm not speaking from experience.
Because the image is colored with Stampin' Pastels you have to use a sealer on the tiles or the Stampin' Pastels will rub off. 
Be sure to use cork or some kind of felt or rubber pads on your base.
The problem I've always had in the past is the StazOn ink would bleed when I sprayed the sealer.  This time I let the tile sit for 24 hours before sealing it, and I kept my can several inches away from the tile and sprayed only a light coat.  I don't know if that's what did it or not, but this time it didn't bleed.

Enjoy!

Wednesday, July 28, 2010

Who Doesn't Love a Garage Sale?

Do you love a bargain? 
Do you love Stampin' Up! products? 
Well, here's your chance to get both at the
same time. 

When:  Saturday Aug. 7th 9:00 a.m. to 12:00 p.m.
Where: Gates Wesleyan Church
             2060 Long Pond Road
             Rochester, NY 14606
What: Gently used retired Stampin' Up! products

For more information contact
Tammy Clarke
585-621-0727

So, grab your friends, your wish lists and your
money and come and check out the bargains.


Tuesday, July 27, 2010

Hostess Promotion

Have you been thinking about having a Stampin' Up! workshop at your house, but are still undecided? Well, now is the perfect time to take the plunge; SU! is having a special promotion starting today and goes until August 31st.

If you host a workshop with total sales (before taxes and shipping and handling) of $350 or more you get an extra $25.00 in free product...on top of the standard hostess gifts. What does that mean? Instead of $40.00 in free product you would get $65.00 in free product.

So, don't put it off any longer, contact me via phone or email to schedule your workshop before this offer ends on August 31st.

Monday, July 26, 2010

Just Believe

Good Evening Everyone, today's card is for a sketch challenge on Create with Connie and Mary.


Designing this card for this challenge I realized that I definitely need to include more ribbon in my next order.  I love putting ribbon in my cards, but it's not as much fun when you're limited in your choices.  Anyway, this is what I came up with for the sketch.  I hope you like it.


Supplies
Stamps:  Just Believe
Cardstock:  Cherry Cobbler, Pumpkin Pie, Night of Navy, Whisper White
Ink:  Cherry Cobbler, Pumpkin Pie, Night of Navy
Punches:  1-3/8' Circle Punch, 1-3/4" Scallop Circle Punch
Accessories:  Top Note Big Shot Die, Night of Navy 1/4" Grosgrain Ribbon, Mini Glue Dots, Cutter Tool, Stamping Sponges, Paper Piercer, Mat Pack, SNAIL

Tips
I used the Paper Piercer in the 3 corners and along all of the edges of the Pumpkin Pie Cardstock.
I decided to distress the Pumpkin Pie Cardstock after I had the ribbon and the Top Note all SNAILed together...it would have been easier if I distressed it first.  Oh well, what are you gonna do, it still turned out okay in the end.

That's all for tonight, have a great evening and I'll see you tomorrow.

Sunday, July 25, 2010

A Tutorial for a Challenge

Hi Again, for the second time today.  Today's card is for a challenge on Scrapmaster's Paradise, it is color challenge #57.


Don't you just love this color combo?  I especially love Marina Mist, it is another one of my new favourites that SU! came out with this year. 


To do this card I did a technique that I learned at an all day stamping event host by my 3rd upline, Linda Bauwin.  This technique in particular was taught by Sherm Langan, an SU! Demonstrator.

Supplies
Stamps:  For All You Do, Occassional Quotes
Paper:  Crumb Cake, Marina Mist, Confetti White, Whisper White
Ink:  Rich Razzleberry, Old Olive, Blushing Bride
Stampin' Write Markers:  Marina Mist and Blushing Bride
Punches:  Modern Label Punch
Accessories:  Bashful Blue 5/8" Satin Ribbon, Brights and Subtles Brads, Stamp-a-ma-Jig, Sponge Daubers, Crimper, Color Spritzer Tool, Vanilla Shimmer Smooch Spritz, Color Catcher, Paper Snips, Grid Paper, Dimensionals, SNAIL

Tips
For this tutorial I did all of my folding, crimping etc. on a piece of Confetti White Cardstock that was not stamped on so you could have a clear picture, but you definitely want to be sure to stamp, color, spritz, etc. your image before doing any of the following.
I started with a pice of Confetti White Cardstock 5" x 3-3/4" and using my Grid Paper I marked the 5" sides with a pencil at 2-1/2" and on the 3-3/4" sides I marked at 1-7/8", and then lightly with a pencil I drew lines connecting those marks.


I then used my bone folder and scored along those pencil marks.  You really don't need to mark the lines with a pencil, you could just jump to making score lines with your Bone Folder if you wanted.  Once you have your lines scored, fold them along the score lines.


If you marked your paper with a pencil, it doesn't matter which way you fold your corners, you just want to make sure the pencil marks are on the side you apply your SNAIL to when mounting this to your card.  With your paper folded along the score lines run it through the crimper.


And this is what it will look like when finished running it through the crimper.


I hope this is clear, and you have fun trying this technique.  I love it and use it often in my cards.

Pals Paper Art Sketch Challenge #52

Hello everyone!  Today's card is a relatively simple one that I made for the Pals Paper Arts Sketch Challenge #52.  Check out their blog, they have a very talented design team and create wonderful cards for their challenges.  Here is the sketch for this weeks challenge.


I used the new In Colors and some new products for this card.


Supplies
Stamps:  Just Believe
Paper:  Concord Crush, Pear Pizzazz, Peach Parfait (kind of sounds like a fruit salad LOL), In Color Patterns Designer Series Paper Stack, Whisper White
Ink:  Concord Crush, Peach Parfait
Punches:  2-3/8" Scallop Circle, 1-3/4" Scallop Circle, 1-3/8" Circle, 1-1/4" Square 
Accessories:  Vintage Wallpaper Embossing Folder, Pear Pizzazz 1/2" Stitched-Poly Ribbon, Dimensionals, SNAIL

Tips
The circle stamp in the Just Believe coordinates perfectly with the 1-3/8" Circle Punch.
SU! has several stamps that coordinate with their punches, and they identify which stamps coordinate with which punches all throughout the Idea Book and Catalog.
There are now 2 different Scallop Circle Punches available which is great for layering.
I used the 1-1/4" Square Punch to make the cut on the edge of the Peach Parfait cardstock

Thanks for checking out my blog today.  Feel free to email me if you have any questions.

Saturday, July 24, 2010

Hand Stamped Sentiments Sketch #25

Hi All...Today's post is a card I made for Hand Stamped Sentiments Sketch Challenge #25


This sketch comes from the monthly magazine all Stampin' Up! demonstrators get called Stampin' Success. Anyway, here is my card.


Supplies
Stamp:  Tiny Tags, Bella Toile
Paper:  Marina Mist, Daffodil Delight, Rich Razzleberry, Confetti White
Ink:  Marina Mist, Daffodil Delight, Rich Razzleberry
Punches:  Jewelry Tag
Accessories:  Scallop Rectangle Clearlit, Beautiful Wings Embosslit Die, Gold Glow Smooch Spritz, Color Catcher, Brights Brads, Cutter Kit, Matt Pack, Paper Piercing Tool, Sponge Daubers, Multipurpose Liquid Glue, SNAIL

Tips
I used the cutting tool to distress the edges of the paper, and then the sponge daubers to add color to those edges. 
When I applied the Gold Glow Smooch Spritz to the Daffodil Delight cardstock I used the Color Catcher to keep from getting the Smooch Spritz all over everything.
When using the Smooch Spritz be sure to shake up the bottle well, and spray your object at least 12 inches away; if you spray too close you will have gobs of color on your project.  If the sprayer gets clogged you can unscrew the top and put it in some warm water to unclog it. 

Enjoy!

Tuesday, July 20, 2010

I Won Another Challenge

Scrapmaster's Paradise has weekly color challenges and on July 12th I was a Top 5 Pick for Color Challenge #55. .


Check out Samantha's blog and weekly color challenges, she uses some awesome color schemes for her challenges.
Have a great day!

Saturday, July 17, 2010

When You're On, You're On!

So first I couldn't get into a creative groove, now I can't stop, LOL. This card is for 2 challenges, the first challenge is from Just Add Ink and it is a "Just Add...EMBOSSING! challenge. The second challenges is for Pals Paper Arts and it's a Wedding Theme Challenge.
Since Just Add Ink is an embossing challenge I decided that it was finally time for me to do the Split Negative Technique which you can find the tutorial for it on the Splitcoast Stampers website, or by clicking here.
When you do the split negative you get 2 separate images to work with, so you know I had to make 2 different cards.


For the first card I didn't do any layers, I just attached the split negative directly to the card. For the greeting I also did a split negative, but just with stamping, I didn't emboss. The more I look at this card I think I want to add some white brads to it, hmmmm.


I've seen some cards where they've done a couple layers and it really had a nice look to it. I was going to that with this card, but the problem is that the Medallion is so large and in order to do more layers you have to cut more of the Medallion off, and I didn't want to do that. So, for the second card I did only 1 layer, using Whisper White as my base. I tried it with using Basic Black as my base but for some reason the image didn't seem to pop as much when layered on the white.


Supplies

Stamps: Medallion
Ink: VersaMark, Basic Black, Whisper White Craft Ink
Paper: Whisper White, Basic Black
Punches: Word Window Punch
Accessories: Black Emobssing Powder, White Embossing Powder, Embossing Buddy, Powder Pals, Paper Snips, Neutral Brads, Mat Pack, Paper PiercerSNAIL

Tips
After I embossed the image is attached it to a piece of plain printer paper. This enabled me to play around with the image before adhering it to anything, and the plain printer paper is very think so you can't even tell its there when you look at the finished product.
Don't have your fan blowing in you're direction when you are using embossing powder, it makes a little mess.

Have a great day.

Getting Back Into the Groove

Hi all...I'm sorry I haven't posted in a while, I guess you could say I've been experiencing a creativity block. I've been in my craft room playing but nothing I try to do pans out...I could show you pictures of my attempts at being creative, but that would just be depressing. Anyway, I've finally found my mojo again, thanks to Mojo Monday and Create with Connie and Mary.

Using Mojo Monday's Sketch #147


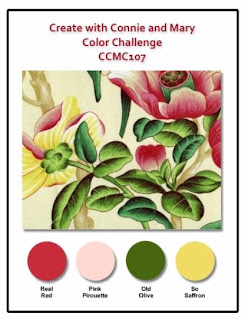
and Create with Connie and Mary Color Challenge #107


I was able to come up with a beautiful card.


Supplies
Stamps: For All You Do
Paper: Real Red, Pink Pirouette, Old Olive, So Saffron, Whisper White
Ink: Real Red, Pretty in Pink (I don't have Pink Pirouette ink...Yet), So Saffron
Punches: 2-3/8" Scallop Circle, 1-3/4" Scallop Circle, Boho Blossoms, Modern Label, 3/16" Small Corner, 1/16" Circle Punch
Accessories: Vintage Wallpaper Embossing Folder, Brights (Old Olive) and Subtles (Pretty in Pink) Brads, Basic Pearls, Mini Glue Dots, Paper Snips, SNAIL

Tips
I use the Mini Glue Dots to adhere Brads to card stock.
The smallest half scallop on the bottom right of the card is from the smallest flower on the Boho Blossoms punch.
The butterfly was done using the Kissing Technique. I stamped the butterfly with Pretty in Pink and the dots in Real Red and then stamped onto the butterfly with the dots. The Pearls are one of Stampin' Up's! newest product, and they already have adhesive on them, so when you take the Pearl off the backing it comes on be careful not to touch the back of the Pearl. I used tweezers to help with the placement.

Enjoy and have a great day.

Sunday, July 11, 2010

Can you Tell I Enjoy Challenges

Normally I'm a person that browses blogs looking for cards to CASE, but since I've started my own blog and have a place to showcase my cards I've really enjoyed all of the challenges out there. Don't get me wrong, I still scour the internet for cards to CASE, and with all of the talented SU! demonstrators out there I never have a hard time finding one I like.

The card for today's post is combing 2 challenges. The first is a color challenge, Color Combo #55 at Scrapmaster's Paradise.

.

And the second is Sketch Challenge#106 at Create with Connie and Mary


This is the first time I've participated in these 2 challenges. So, without further delay here is my card.


Supplies
Stamps: Fast and Fabulous, Elements of Style
Paper; Cajun Craze, Old Olive, Daffodil Delight, Whisper White
Ink: Cajun Craze, Old Olive, Daffodil Delight
Punches: 1 3/4" Scallop Scallop Circle, 1 3/8" Circle, 1 1/4" Circle, 1" Circle
Accessories: Old Olive Brads, Paper Piercer, Matt Pack, Stamping Sponges, SNAIL, Dimensionals

Tips
I made my own background paper using the Daffodil Delight cardstock and randomly stamping on it with Daffodil Delight and Cajun Craze ink with the Fast and Fabulous stamp set.
I sponged the edges of the Daffodil Delight and Whisper White with Cajun Craze Classic Ink, and the Old Olive Cardstock with Old Olive Classic Ink.
Around the right edge of the Old Olive layer I used my Paper Piercer and Matt Pack to create a little design.
I know I said I would post the Stamp-A-Ma-Jig and Spritzer tutorials today, but honestly I forgot all about it. I will post them later today.
For now, I hope you enjoy the card and have a great day.

Saturday, July 10, 2010

Hand Stamped Sentiments Splash Challenge

Today's card is for a color challenge at Hand Stamped Sentiments.
This challenge is called a Splash Challenge and included 5 colors,


I don't know why but that seemed like a lot of colors and it took me awhile to put it together, but I'm pleased with the final product.


Supplies
Stamps: Greenhouse Garden, Teeny Tiny Wishes
Paper: Chocolate Chip, Crumb Cake, Whisper White, Rose Red
Ink: rose Red, Basic Black, Old Olive, Chocolate Chip
Punches: Modern Label, Word Window
Accessories: 5/8" Old Olive Satin Ribbon, Color Spritzer Tool, Cutter Kit, Vintage Wallpaper Embossing Folder, Sponge Daubers, Paper Piercer, Mat Pack, Old Olive Brads, Stamp-A-Ma-Jig

Tips
The edges of the Crumb Cake and Whisper White were distressed with the Cutter Kit and then sponged with Classic Ink.
The "spray" of color on the Whisper White was done using the Olive Stampin' Write Marker and the Color Spritzer Tool.
Greenhouse Garden is a 2-step stamp set, which means the flower image was stamped first with the Rose Red Ink, and the the back lines were stamped over the Rose Red. To do this the Stamp-A-Ma-Jig is an absolute necessity, it helps with the placement of the stamps so things line up.

I will post a tutorial on using the Stamp-A-Ma-Jig and the Color Spritzer Tool later on today.

Friday, July 9, 2010

PPA-50

The challenge this week at Pals Paper Arts is a color challenge.


It's definitely a different kind of color combo, but it was fun coming up with a card for it. If you check out their blog you'll see a lot of great cards using that color combo.

The card I made used a technique that I learned from my 3rd upline, Linda Bauwin, at an all day stamping event in Ohio that she organized and had 4 members of her team (including my upline Mary) design cards for.
Anyway, I'm not even sure what this is called, but it involves chalk and embossing. I really fell in love with this technique and the outcome of the cards made using it. The picture I'm going to post doesn't give it justice, but hopefully you will get the idea.


Supplies
Stamps: Because I Care
Paper: Chocolate Chip, So Saffron, Basic Gray
Ink: VersaMark, Chocolate Chip
Stampin' Pastels: So Saffron
Punches: Oval Scallop, Large Oval
Accessories: Iridescent Ice Stampin' Emboss Powder, Heat Tool, Sponge Dauber, Dimensionals, SNAIL

Tips
Using a sponge dauber I colored over an entire piece of Going Grey cardstock with So Saffron Stampin' Pastels.
Then using VersaMark I stamped the flower image and design onto the chalked Going Gray cardstock.
I then embossed the flower image and design with the Irridescent Ice Stampin' Powder.
And that's it, the flower really glitters and stands out on the chalked cardstock.
If you have any questions please feel free to email, or post the question on my blog and I will respond ASAP.
Enjoy, and have a great day.

Really?

I thought I'd share a couple non-stamping pictures with you today. I say non-stamping because everytime I go into my stamp room my cat Muzby (as in I Must Be crazy for bringing you home) does everything she can to prevent me from stamping. No joke, I sometimes feel like I need to get a sitter to occupy Muzby so I can do my thing. Anyway, here she is doing her best to interfere with things.


This one was actually taken a few weeks ago, do you notice the innocent "what are you going to do about it look" she has on her face?


This one is the, "I hope you don't mind if I just stretch out and relax while you do a little stamping" pose.


This last picture is Muzby's "did you ever think I might like to do a little stamping with you, of course not because you only think of yourself" pose.
You are probably wondering if Muzby is on the desk right now, and the answer would be no because I haven't gotten any of my stamping materials out yet. Have no fear though, within 10 minutes of me grabbing some paper and stamps she'll stroll in, climb up on my desk, and make herself comfortable.

Thursday, July 8, 2010

Mojo Monday...Again

I've made a second card to enter into the Mojo Sketch 146 contest at Mojo Monday - The Blog. This is the sketch for this week's contest.


The card I made for this one uses similar colors as the one posted yesterday, but has a totally different look to it.


Supplies
Stamps: Watercolor Trio
Ink: Old Olive and Cherry Cobbler Stampin' Write Markers
Paper: Basic Black, Cherry Cobbler, Whisper White, Newsprint DSP
Punches: Large Oval, Scallop Oval
Accessories: Basic Black 1 1/4" Striped Grosgrain Ribbon, SNAIL, Dimensionals, Paper Snips, Glue Dots

Tips
The butterfly was cut out with my Paper Snips and a Dimensional was used to give it a little dimension.

I hope you enjoy this card, thanks for stopping by and I hope you have a great day.

Wednesday, July 7, 2010

Mojo Monday Sketch 146

Today's post is for Mojo Monday.sketch challenge #146


I used the new Newsprint DSP for this card, I love this paper and was glad to finally find a way to use it.


Supplies
Stamps: Vintage Vogue, Watercolor Trio
Paper: Newsprint DSP, Basic Black, Cherry Cobbler, Baja Breeze, Whisper White
Ink: Cherry Cobbler and Marina Mist
Punches: Modern Label, Scallop Oval, Large Oval
Accessories: Basic Black 5/8" Grosgrain Ribbon, Silver Brads, Paper Snips, Paper Piercer, Dimensionals, SNAIL

Tips
I don't have the Oval Original Die yet, so I used my Cricut to cut the ovals.
The Vintage Vogue also has a leaf stamp, so you could add to the flowers if you wanted. I decided not to do that, for no reason really.
The Baja Breeze oval is stamped randomly with the flouish stamp from Vintage Vogue.
I don't have my Baja Breeze ink pad yet, so I stamped the small flower with Marina Mist. You can barely tell the difference, but if you can I would stick with the Baja Breeze ink. I didn't think of it at the time, but you could color the small flower with the Baja Breeze marker and do the huff and stamp technique.
The flowers were stamped on Whisper White and then cut with the Paper Snips

I hope you enjoy this card, I would love to know what you think