Showing posts with label For All You Do. Show all posts

Sunday, July 25, 2010

A Tutorial for a Challenge

Hi Again, for the second time today.  Today's card is for a challenge on Scrapmaster's Paradise, it is color challenge #57.


Don't you just love this color combo?  I especially love Marina Mist, it is another one of my new favourites that SU! came out with this year. 


To do this card I did a technique that I learned at an all day stamping event host by my 3rd upline, Linda Bauwin.  This technique in particular was taught by Sherm Langan, an SU! Demonstrator.

Supplies
Stamps:  For All You Do, Occassional Quotes
Paper:  Crumb Cake, Marina Mist, Confetti White, Whisper White
Ink:  Rich Razzleberry, Old Olive, Blushing Bride
Stampin' Write Markers:  Marina Mist and Blushing Bride
Punches:  Modern Label Punch
Accessories:  Bashful Blue 5/8" Satin Ribbon, Brights and Subtles Brads, Stamp-a-ma-Jig, Sponge Daubers, Crimper, Color Spritzer Tool, Vanilla Shimmer Smooch Spritz, Color Catcher, Paper Snips, Grid Paper, Dimensionals, SNAIL

Tips
For this tutorial I did all of my folding, crimping etc. on a piece of Confetti White Cardstock that was not stamped on so you could have a clear picture, but you definitely want to be sure to stamp, color, spritz, etc. your image before doing any of the following.
I started with a pice of Confetti White Cardstock 5" x 3-3/4" and using my Grid Paper I marked the 5" sides with a pencil at 2-1/2" and on the 3-3/4" sides I marked at 1-7/8", and then lightly with a pencil I drew lines connecting those marks.


I then used my bone folder and scored along those pencil marks.  You really don't need to mark the lines with a pencil, you could just jump to making score lines with your Bone Folder if you wanted.  Once you have your lines scored, fold them along the score lines.


If you marked your paper with a pencil, it doesn't matter which way you fold your corners, you just want to make sure the pencil marks are on the side you apply your SNAIL to when mounting this to your card.  With your paper folded along the score lines run it through the crimper.


And this is what it will look like when finished running it through the crimper.


I hope this is clear, and you have fun trying this technique.  I love it and use it often in my cards.

Saturday, July 17, 2010

Getting Back Into the Groove

Hi all...I'm sorry I haven't posted in a while, I guess you could say I've been experiencing a creativity block. I've been in my craft room playing but nothing I try to do pans out...I could show you pictures of my attempts at being creative, but that would just be depressing. Anyway, I've finally found my mojo again, thanks to Mojo Monday and Create with Connie and Mary.

Using Mojo Monday's Sketch #147


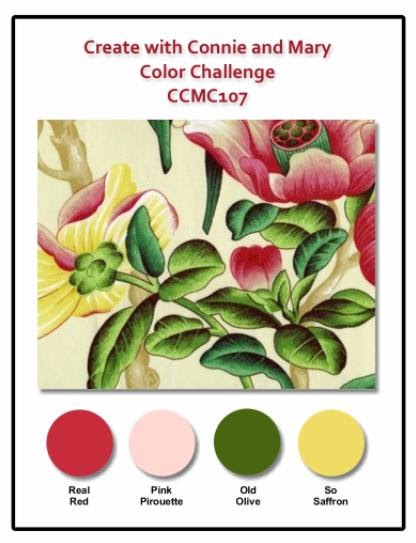
and Create with Connie and Mary Color Challenge #107


I was able to come up with a beautiful card.


Supplies
Stamps: For All You Do
Paper: Real Red, Pink Pirouette, Old Olive, So Saffron, Whisper White
Ink: Real Red, Pretty in Pink (I don't have Pink Pirouette ink...Yet), So Saffron
Punches: 2-3/8" Scallop Circle, 1-3/4" Scallop Circle, Boho Blossoms, Modern Label, 3/16" Small Corner, 1/16" Circle Punch
Accessories: Vintage Wallpaper Embossing Folder, Brights (Old Olive) and Subtles (Pretty in Pink) Brads, Basic Pearls, Mini Glue Dots, Paper Snips, SNAIL

Tips
I use the Mini Glue Dots to adhere Brads to card stock.
The smallest half scallop on the bottom right of the card is from the smallest flower on the Boho Blossoms punch.
The butterfly was done using the Kissing Technique. I stamped the butterfly with Pretty in Pink and the dots in Real Red and then stamped onto the butterfly with the dots. The Pearls are one of Stampin' Up's! newest product, and they already have adhesive on them, so when you take the Pearl off the backing it comes on be careful not to touch the back of the Pearl. I used tweezers to help with the placement.

Enjoy and have a great day.