Saturday, July 17, 2010

Getting Back Into the Groove

Hi all...I'm sorry I haven't posted in a while, I guess you could say I've been experiencing a creativity block. I've been in my craft room playing but nothing I try to do pans out...I could show you pictures of my attempts at being creative, but that would just be depressing. Anyway, I've finally found my mojo again, thanks to Mojo Monday and Create with Connie and Mary.

Using Mojo Monday's Sketch #147


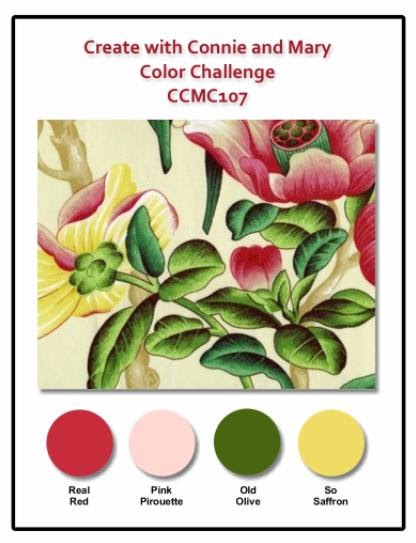
and Create with Connie and Mary Color Challenge #107


I was able to come up with a beautiful card.


Supplies
Stamps: For All You Do
Paper: Real Red, Pink Pirouette, Old Olive, So Saffron, Whisper White
Ink: Real Red, Pretty in Pink (I don't have Pink Pirouette ink...Yet), So Saffron
Punches: 2-3/8" Scallop Circle, 1-3/4" Scallop Circle, Boho Blossoms, Modern Label, 3/16" Small Corner, 1/16" Circle Punch
Accessories: Vintage Wallpaper Embossing Folder, Brights (Old Olive) and Subtles (Pretty in Pink) Brads, Basic Pearls, Mini Glue Dots, Paper Snips, SNAIL

Tips
I use the Mini Glue Dots to adhere Brads to card stock.
The smallest half scallop on the bottom right of the card is from the smallest flower on the Boho Blossoms punch.
The butterfly was done using the Kissing Technique. I stamped the butterfly with Pretty in Pink and the dots in Real Red and then stamped onto the butterfly with the dots. The Pearls are one of Stampin' Up's! newest product, and they already have adhesive on them, so when you take the Pearl off the backing it comes on be careful not to touch the back of the Pearl. I used tweezers to help with the placement.

Enjoy and have a great day.

Sunday, July 11, 2010

Can you Tell I Enjoy Challenges

Normally I'm a person that browses blogs looking for cards to CASE, but since I've started my own blog and have a place to showcase my cards I've really enjoyed all of the challenges out there. Don't get me wrong, I still scour the internet for cards to CASE, and with all of the talented SU! demonstrators out there I never have a hard time finding one I like.

The card for today's post is combing 2 challenges. The first is a color challenge, Color Combo #55 at Scrapmaster's Paradise.

.

And the second is Sketch Challenge#106 at Create with Connie and Mary


This is the first time I've participated in these 2 challenges. So, without further delay here is my card.


Supplies
Stamps: Fast and Fabulous, Elements of Style
Paper; Cajun Craze, Old Olive, Daffodil Delight, Whisper White
Ink: Cajun Craze, Old Olive, Daffodil Delight
Punches: 1 3/4" Scallop Scallop Circle, 1 3/8" Circle, 1 1/4" Circle, 1" Circle
Accessories: Old Olive Brads, Paper Piercer, Matt Pack, Stamping Sponges, SNAIL, Dimensionals

Tips
I made my own background paper using the Daffodil Delight cardstock and randomly stamping on it with Daffodil Delight and Cajun Craze ink with the Fast and Fabulous stamp set.
I sponged the edges of the Daffodil Delight and Whisper White with Cajun Craze Classic Ink, and the Old Olive Cardstock with Old Olive Classic Ink.
Around the right edge of the Old Olive layer I used my Paper Piercer and Matt Pack to create a little design.
I know I said I would post the Stamp-A-Ma-Jig and Spritzer tutorials today, but honestly I forgot all about it. I will post them later today.
For now, I hope you enjoy the card and have a great day.

Saturday, July 10, 2010

Hand Stamped Sentiments Splash Challenge

Today's card is for a color challenge at Hand Stamped Sentiments.
This challenge is called a Splash Challenge and included 5 colors,


I don't know why but that seemed like a lot of colors and it took me awhile to put it together, but I'm pleased with the final product.


Supplies
Stamps: Greenhouse Garden, Teeny Tiny Wishes
Paper: Chocolate Chip, Crumb Cake, Whisper White, Rose Red
Ink: rose Red, Basic Black, Old Olive, Chocolate Chip
Punches: Modern Label, Word Window
Accessories: 5/8" Old Olive Satin Ribbon, Color Spritzer Tool, Cutter Kit, Vintage Wallpaper Embossing Folder, Sponge Daubers, Paper Piercer, Mat Pack, Old Olive Brads, Stamp-A-Ma-Jig

Tips
The edges of the Crumb Cake and Whisper White were distressed with the Cutter Kit and then sponged with Classic Ink.
The "spray" of color on the Whisper White was done using the Olive Stampin' Write Marker and the Color Spritzer Tool.
Greenhouse Garden is a 2-step stamp set, which means the flower image was stamped first with the Rose Red Ink, and the the back lines were stamped over the Rose Red. To do this the Stamp-A-Ma-Jig is an absolute necessity, it helps with the placement of the stamps so things line up.

I will post a tutorial on using the Stamp-A-Ma-Jig and the Color Spritzer Tool later on today.

Friday, July 9, 2010

PPA-50

The challenge this week at Pals Paper Arts is a color challenge.


It's definitely a different kind of color combo, but it was fun coming up with a card for it. If you check out their blog you'll see a lot of great cards using that color combo.

The card I made used a technique that I learned from my 3rd upline, Linda Bauwin, at an all day stamping event in Ohio that she organized and had 4 members of her team (including my upline Mary) design cards for.
Anyway, I'm not even sure what this is called, but it involves chalk and embossing. I really fell in love with this technique and the outcome of the cards made using it. The picture I'm going to post doesn't give it justice, but hopefully you will get the idea.


Supplies
Stamps: Because I Care
Paper: Chocolate Chip, So Saffron, Basic Gray
Ink: VersaMark, Chocolate Chip
Stampin' Pastels: So Saffron
Punches: Oval Scallop, Large Oval
Accessories: Iridescent Ice Stampin' Emboss Powder, Heat Tool, Sponge Dauber, Dimensionals, SNAIL

Tips
Using a sponge dauber I colored over an entire piece of Going Grey cardstock with So Saffron Stampin' Pastels.
Then using VersaMark I stamped the flower image and design onto the chalked Going Gray cardstock.
I then embossed the flower image and design with the Irridescent Ice Stampin' Powder.
And that's it, the flower really glitters and stands out on the chalked cardstock.
If you have any questions please feel free to email, or post the question on my blog and I will respond ASAP.
Enjoy, and have a great day.

Really?

I thought I'd share a couple non-stamping pictures with you today. I say non-stamping because everytime I go into my stamp room my cat Muzby (as in I Must Be crazy for bringing you home) does everything she can to prevent me from stamping. No joke, I sometimes feel like I need to get a sitter to occupy Muzby so I can do my thing. Anyway, here she is doing her best to interfere with things.


This one was actually taken a few weeks ago, do you notice the innocent "what are you going to do about it look" she has on her face?


This one is the, "I hope you don't mind if I just stretch out and relax while you do a little stamping" pose.


This last picture is Muzby's "did you ever think I might like to do a little stamping with you, of course not because you only think of yourself" pose.
You are probably wondering if Muzby is on the desk right now, and the answer would be no because I haven't gotten any of my stamping materials out yet. Have no fear though, within 10 minutes of me grabbing some paper and stamps she'll stroll in, climb up on my desk, and make herself comfortable.

Thursday, July 8, 2010

Mojo Monday...Again

I've made a second card to enter into the Mojo Sketch 146 contest at Mojo Monday - The Blog. This is the sketch for this week's contest.


The card I made for this one uses similar colors as the one posted yesterday, but has a totally different look to it.


Supplies
Stamps: Watercolor Trio
Ink: Old Olive and Cherry Cobbler Stampin' Write Markers
Paper: Basic Black, Cherry Cobbler, Whisper White, Newsprint DSP
Punches: Large Oval, Scallop Oval
Accessories: Basic Black 1 1/4" Striped Grosgrain Ribbon, SNAIL, Dimensionals, Paper Snips, Glue Dots

Tips
The butterfly was cut out with my Paper Snips and a Dimensional was used to give it a little dimension.

I hope you enjoy this card, thanks for stopping by and I hope you have a great day.

Wednesday, July 7, 2010

Mojo Monday Sketch 146

Today's post is for Mojo Monday.sketch challenge #146


I used the new Newsprint DSP for this card, I love this paper and was glad to finally find a way to use it.


Supplies
Stamps: Vintage Vogue, Watercolor Trio
Paper: Newsprint DSP, Basic Black, Cherry Cobbler, Baja Breeze, Whisper White
Ink: Cherry Cobbler and Marina Mist
Punches: Modern Label, Scallop Oval, Large Oval
Accessories: Basic Black 5/8" Grosgrain Ribbon, Silver Brads, Paper Snips, Paper Piercer, Dimensionals, SNAIL

Tips
I don't have the Oval Original Die yet, so I used my Cricut to cut the ovals.
The Vintage Vogue also has a leaf stamp, so you could add to the flowers if you wanted. I decided not to do that, for no reason really.
The Baja Breeze oval is stamped randomly with the flouish stamp from Vintage Vogue.
I don't have my Baja Breeze ink pad yet, so I stamped the small flower with Marina Mist. You can barely tell the difference, but if you can I would stick with the Baja Breeze ink. I didn't think of it at the time, but you could color the small flower with the Baja Breeze marker and do the huff and stamp technique.
The flowers were stamped on Whisper White and then cut with the Paper Snips

I hope you enjoy this card, I would love to know what you think

Tuesday, July 6, 2010

Canada Day and a Tutorial

As promised in the previous post, this post will have a tutorial for Joseph's Coat technique. This past weekend was all about celebrating and fireworks, so I thought that was the perfect occasion to show case this tutorial. Fireworks come in all kinds of color and the definitely have a POP to them (yeah I know, that's a little lame, oh well LOL).

To start you need some bright colored Classic Ink Pads, Glossy White Card Stock and some Sponge Daubers or Stamping Sponges. Using your Daubers or Sponges you want to color your entire piece of Glossy White card stock (mine is 4 3/4" x 3m1/2") in your different colors of Classic Ink. It doesn't matter how you arrange your colors, and your finished product should look something like this.


Once you have completed this step rub your Embossing Buddy over the entire piece of card stock to minimize static cling and prevent your embossing powder from sticking where you don't want it to.
Using the fireworks stamps from the Canada Day set and your Versamark Ink randomly stamp all over your now colored card stock, and then using your Clear Embossing Powder and Powder Pals cover your card stock with the embossing powder and then gently tap the back of the card stock to remove any excess powder. With your Heat Tool you can then melt the embossing powder, but be careful not to burn yourself or your embossing powder.


Now with your Brayer and Classic Black Ink Pad

cover the entire embossed cardstock with the ink; this will take several layers. Once that step is complete then take a tissue to your card stock and wipe the images that you have emkbossed. The embossed images will 'resist' the ink and once you rub off the black ink they will 'pop' off the page.


Now that this step is complete you can add your layers and complete your card. This is my final product, what do you think?


Supplies
Stamps: Canada Day
Paper: Real Red, Whisper White, Glossy White
Ink: Tempting Turquoise, Melon Mambo, Pretty in Pink, Rich Razzleberry, Daffodil Delight, Elegant Eggplant, Real Red, Basic Black, VersaMark
Punches: 1 1/4" Square Punch
Accessories: Brayer, Clear Embossing Powder, Embossing Buddy, Powder Pals, 3/4" Polka-Dot Grosgrain Ribbon (retired), Dimensionals and SNAIL

Tips
Stick with bright inks, the Rich Razzleberry and Elegant Eggplant ink I used doesn't have the same impact as the others.
Glossy White card stock works best, but you can use Whisper White.
When you wipe off the Basic Black Ink use dry tissue, not baby whites - you'll rub ink of the images and the card stock.

I hope this tutorial is helpful, I would love to see the cards you make using this technique, the possibilities are endless.

Celebrating Canada Day and the Fourth of July

Sorry I haven't posted for a few days, a week actually. but I have a least 2 cards to show today so hopefully that will make up for it. Both cards are in celebration of Canada Day, but the first has a little twist to it. As you see in my profile I live in Rochester, NY, so I thought it was appropriate to celebrate Canada Day and the Fourth of July together in 1 card. So to do that I made a Canada Day card, and added a little blue for the so there would be some Red, White & Blue on the card.


Supplies
Stamps: Canada Day
Ink: Real Red, Night of Navy, Not Quite Navy, Marina Mist, Bashful Blue, Versamark
Paper: Real Red, Whisper White, Night of Navy and Glossy White Card Stock
Accessories: Embossing Buddy, Clear Embossing Powder , Heat Tool, Powder Pals, Dimensionals, SNAIL

Tips
I used a technique called Joseph's Coat to make the background with the fireworks. This technique makes the fireworks sort of 'pop' off the page, but you really don't get the full effect in this picutre. In my next post I will be giving step by step instructions on how to do this and hopefully the 'pop' effect will show better in the pictures.

Enjoy, and a belated Happy Canada Day and Fourth of July to all.

Monday, July 5, 2010

Hand Stamped Sentiments Artist Pick of the Week

My waterfall card won Artist Pick of the Week at Hand Stamped Sentiments. Ok, so there were only 3 entries, but hey, they didn't have to pick 3 winners, they could have only picked 2. ; o )